Monday, October 4, 2010

Implement Cascading Dropdown in SharePoint 2010 List

Implement Cascading Dropdown in SharePoint 2010 List.

To implement cascading dropdown in SharePoint list you dont need to write custom code or do customization in SharePoint Designer. All you need to do is follow below mentioned steps.Its easy!!

I will create 3 lists. Countries, Cities and CountryCity (carries cascading dropdown)

1) Countries List

Create a custom list called Countries and add some name of the countries in the list. No custom columns created. As shown in the image.


2) Cities List

Create another custom list called Cities. Add custom lookup column called Country as shown below.


Now add some items in the Cities list corresponding to the Countries mentioned in the dropdown.


3) CountryCity List

Create a custom list called CountryCity. Create two custom look up columns Country and City. I described above how to create custom column so I am not describing it again.

Cascading dropdown functionality
========================
  • Go to CountryCity List Settings then Advanced Settings. Select No in the last option 'Launch forms in a dialog'.
  • download spcd.js here
  • Upload spcd.js file in any document library on the site. This javascript file will be used to implement cascading functionality.
  • Click on 'Add new item' in the CountryCity list .
  • In this NewForm.aspx page go to 'Site Actions' then 'Edit Page'
  • Add HTML Form Web Part then 'Edit Web Part'
  • In the Source Editor, add the following code. You can download the below code from here

  • Make sure you specify the correct path of .js file (you uploaded in the doc lib) in the src attribute.
  • This is the syntax of calling the js function

var ccd1 = new cascadeDropdowns(ParentDropDownTitle, ChildDropDownTitle, Child2ParentFieldIntName, ChildListNameOrGuid, ChildLookupTargetField)

  • Hit Ok on the web part properties and stop editing NewForm.aspx page.
  • Try to add new item, Country and City dropdowns should work as cascading dropdowns.


  • You have to follow the same steps for EditForm.aspx as well.

If you have a problem implementing it, just drop a comment. It works fine in SharePoint 2007 and SharePoint 2010 both.

Thanks,

JK

Sunday, October 3, 2010

SharePoint 2010 - Disable New Folder Button in a Document Library

How to disable 'New Folder' button in Document Libraries of a site in SharePoint 2010?

There might be a requirement from business to disable 'New Folder' button on a ribbon in all document libraries of a site.
You can achieve this task by going to each and every document library Advanced settings and
chose "No" for "Make 'New Folder' command available? "
Lets say, if you have 50 document libraries in a site and you want to disable New Folder option, how long its gonna take to make that change Or even if you do that manually, how will you make sure if any new Document Library created in a site will have New Folder option disabled?
In order to cater this requirement, the simple way is to create afeature, install it and then enable it on that site where you want to disable New Folder button in lthe document libraries.

Solution:

1) Create a Feature

  • Create a folder in your file system with a name of DisableNewFolderButton.

  • Create two files in this folder, feature.xml and Manifest.xml

  • Edit feature.xml file in notepad and add the following code


  • Edit Manifest.xml file in notepad and add the following code.


DisableNewFolderButton Feature has been created.


2) Install a Feature

  • We need to install this feature in SharePoint 2010.
  • Copy the folder DisableNewFolderButton to SharePoint 14 hive feature folder. (C:\Program Files\Common Files\Microsoft Shared\Web Server Extensions\14\TEMPLATE\FEATURES\).
  • Open stsadm tool as Administrator and exceute the following command. stsadm -o installfeature -name DisableNewFolderButton. Feature will be installed after running this command.

3) Activate a Feature

  • Feature has been installed now we want to activate the feature on a site.
  • Open stsadm tool as Administrator and exceute the following command. stsadm -o activatefeature -name DisableNewFolderButton -Url http://yoursiteurl/

Now you go to the document library in the site, you will see New Folder is not visible as shown in the image.


If you want to make New Folder visible for a particular site, go to Site Actions --> Site Settings --> Manage Site Features. You can see your feature Active as show in the image.


Deactive the feature, New Folder will be visible in the document libraries of that site.

Thanks,

JK

Tuesday, June 15, 2010

Save Site As Template in SharePoint 2010

How to Save Site As Template in SharePoint 2010?

Sometimes you need to create multiple sites that would have same contents or atleast all of the sites have some common web parts, libraries, lists and contents. So instead of creating every site from the scratch, you can create site template then create sites based on that template. This approach would save time and make sure you have consistency across the board.

If you go to Site Actions then Site Settings, you don't find the Save Site As Template option. Atleast I didn't find it anywhere.
If you dont find the option of Save Site As Template, then go to the URL as shown below in the image. type http://yoursite/_layouts/savetmpl.aspx. Enter the complete URL of the site you want to create a template of then append /_layouts/savetmpl.aspx to it. The .aspx page will be opened as shown below.

1) Type the Filename and Template name. Tick the box 'Include Content' if you want to have content included from the source site.


2) You can see your site template name in the Solution Gallery.


3) Since the site template has been created, you go to Site Actions --> New Site
Click on Blank & Custom section on the left navigation. On the main section you will find your site template that you created in previous step. Select the site template then click Create.
You site will be created successfully.


Thanks!

Enjoy :-)

Monday, May 10, 2010

Imtech Content Query Web Part Paging - on bottom right side.

How to display Paging Control in Imtech CQWP - Display on the bottom right side?

I wanted to implement paging on a Content Query Web Part. I came across Imtech Content Query Web Part which provides paging functionality. The issue with this web part is that it shows paging control at the top left corner and the docs are displayed below. My requirement was to display paging control on the bottom right side and docs should be displayed above the paging control.
In order to achieve this, I had to customize style sheets provided by Imtech CQWP web part.

1. Open SharePoint Designer 2010, then click on All Files --> Style Library -->XSL Style Sheets
2. Open the ImtechItemStyle.xsl file and select the code highlighted in the below image and cut (CTRL X) it.


3. Open the ImtechContentQueryMain.xsl file and paste the code before end of ForEach loop as shown in the image below.


4. Save both the files ImtechContentQueryMain.xsl and ImtechItemStyle.xsl. Add Imtech Content Query Web Part on the page. Point these style sheets in the web part properties. You will see the paging control on the bottom right corner of the control.

Thursday, May 6, 2010

Secure Store Application ID in SharePoint 2010

Secure Store Application ID

Each Secure Store Service entry contains an application ID that is used to retrieve a set of credentials from the secure store database. Each application ID can have permissions applied so that only specific users or groups can access the credentials that are stored for the application ID. Applications use application IDs to retrieve credentials from the secure store database on behalf of a user. The application can then use the retrieved credentials to access a data source.


I will walk you through - how to create Secure Store Application ID that you can use in External Content Type.

a) Go to SharePoint Central Admin then Manage Service Applications.
b) Click on Secure Store Service Application. If Secure Store Service is not setup, then you have to create one. Look at my article How to Create Secure Store Service.


c) Click on 'Generate New Key' on the ribbon.


d) Enter pass phrase as you like.

e) Now we will have to create Secure Store Application that would help in impersonation. Click New on the ribbon.

f) Enter the required values for the target application settings. Click Next.


f) You can add more fields if you like, for now use the default Windows Username and Windows Password. Click Next.


g) Specify Administrator for the target application. You can specify Members for the target application as well if you like to. Click Ok.


h) Now your Target Application has been created successfully.

i) Now tick the check box beside the Target Application then click on Set Credentials on the ribbon to set the credentials for impersonation.

j) Enter a credential owner, the windows username and windows password that will be used for impersonation by this target application then click Ok.


Now Application ID has been created we can use this target application for impersonation to access BCS External list.

Thanks,
JK

Wednesday, May 5, 2010

Business Connectivity Service - External List in SharePoint 2010

Business Connectivity Services Overview:

Microsoft SharePoint Server 2010 and the Microsoft Office 2010 suites include Microsoft Business Connectivity Services, which are a set of services and features that provide a way to connect SharePoint solutions to sources of external data and to define external content types that are based on that external data. A Technet article describes in details about BCS BCS Overview - Technet

Here I am gonna talk about how to create a SharePoint external list and then modify the data that would reflect the changes in the external source as well.
Inorder to make BCS External List working, you have to setup these 2 services.

BDC Service and Secure Store Service.
Read my articles about how to setup these services

1) BDC Service

2) Secure Store Service

After setting up these services successfully we have to create external content type.
An External Content Type is an xml file that defines an object that can be used in business application. The definition could be:
* The fields of data that are contained in the object
* The methods to create, read, update, query, or delete that object
* Actions that users can take on the object
* Information that supports connecting to the external data source that provides the object’s data

Create External Content Type

a) Open SharePoint Designer 2010(SPD)
b) Open the site
c) Click on External Content Type at left panel.


d) On the ribbon top left corner click on 'External Content Type'
e) A page will be opened where you can define the name, description, data source etc.


f) Click on "click here to discover external data sources and define operations"
g) Operation Designer will be opened. Click on Add Connection to create a connection with your external data source.


h) Select 'SQL Server' as data source type


i) A new popup will be opened where you define the SQL Server Connection details.


j) On the radio buttons select 'Connect With Impersonated Windows Identity' and provide the Secure Store Application ID. (You can read up my article what is Secure Store Application)
Note: If your external list does not work with 'Connect With Impersonated Windows Identity' then try using 'Connect With Impersonated Custom Identity'. Windows Identity worked with me.
k) Now External Content Type has been setup succesffully, lets go and create External List where we can pull the data through this connection and manipulate with the data.

Note: Try creating External Content Type on the local system where SharePoint 2010 is installed. First I tried to create ECT using remote machine, it kept asking me credentials and did not let me create the Connection to external data source.

Create External List

a) Go to your sharepoint site.
b) Click Site Actions --> View All Site Content
c) Click on Create
d) Select External List then create


e) A page will be opened; define the name of the External List and at the bottom, click on
External Content Type Picker. It will open up a popup where you can see the content type you created in the previous steps. Select the Content Type, click OK


f) Click on Create button. Your External List will be created and the data will be displayed.


h) Select check box on any row - I chose second row then click on Edit Item on the ribbon.
i) Modify data in the fields then hit Save. In my case I have fields called LastName, FirstName. I have changed the values as Lawrence, Smith


j) Screen will refresh and as you can see data has been saved in the list.
k) Now lets verify if the changes have really been reflected in the external system or not.
l) You can see in the second row, data has been modified in SQL Server table under columns LastName and FirstName.


I hope this has been informative for you.

Thanks,
JK

Sunday, April 11, 2010

Secure Store Service - SharePoint 2010


Secure Store Service in SharePoint 2010

The Secure Store Service stores credentials in database(user identity and password) for application IDs that can be used by applications to authorize access to shared resources. SharePoint 2010 can use the secure store database to store and retrieve credentials to access external data sources.
The support for storing the credentials of multiple back-end systems using multiple application IDs is provided in the Secure Store Service.

Before using the Secure Store Service to create target applications, you must provide it with a pass phrase. The pass phrase is used to generate a key that is used to encrypt and decrypt the credentials that are stored in the Secure Store Service database. If you have to supply the initial pass phrase, you will see the following message when you open a Secure Store Service application instance: Please generate a new key for this Secure Store Service application.

How to create Secure Store Service in SharePoint 2010?


* Go to SharePoint Central Admin


* Click on Manage Service Applications under Application Management heading.


* On the ribbon, click on New button that will show the list of the services you can create. Click on Secure Store Service.


* Enter necessary details as Name, Database server, Database, Credentials etc.


* Click Ok to create service. If there is no problem with DB or service account, Secure Store Service will be created successfully. :-)


* You need to start the Secure Store Service after it has been created.

* Go to Central Admin

* Click on Manage Services on Server under System Settings heading.

* Locate the Secure Store Service then click start.


That's it!!!

So this is the creation of Secure Store Service. I am gonna discuss about the BDC - How to create external content type to access external data in SharePoint 2010 in my next post. And what additional steps need to be done in Secure Store Service and in BDC Service to make BDC work in SharePoint 2010.


BDC Service in SharePoint 2010

How to create Business Data Connectivity Service Application ?

BCS in SharePoint 2010 is all about connecting with external data. You can leverage SharePoint 2010 BCS component and manipulate with your external data with just a few clicks. In order to use external data in SharePoint 2010 you should have BDC Service up and running.

* Go to SharePoint Central Admin

* Click on 'Manage Service Application' under Application Management heading.


* On Ribbon, click on New dropdown then click on Business Data Connectivity.


* A pop up will be opened where you fill out the necessary information then click OK.

* If there is no problem connecting with DB or Service Account, a message will be displayed "BDC Service Application has been created successfully".

* When the service applications are created they are not started by default. You have to Start the Business Data Connectivity Service manually.

* Go to Central Admin and click on 'Manage Services on Server' under System Settings heading.


* Click on Start against Business Data Connectivity Service.


That's It!!!

Saturday, April 10, 2010

Branding in SharePoint 2010 - CSS Classes

I was working on a project where I happened to implement Branding on SharePoint site. I created/modified the existing CSS Classes to achieve the desired result.
Here are some CSS classes listed below that I modified:

To hide Quick Launch

.ms-quicklaunchouter
{
display:none;
}
#s4-leftpanel-content
{
display:none;
}
.s4-ca
{
MIN-HEIGHT: 324px; BACKGROUND: #fff; MARGIN-LEFT: 0px; MARGIN-RIGHT: 0px
}

Change global navigation background color

.s4-tn
{
background:white;
}

Change the font color of the site actions text

.ms-menu-a span
{
color:black;
}

To hide title logo - breadcrumb

.s4-titlelogo
{
display:none;
}

Make breadcrumb bar height small
.s4-title, .s4-lp
{
background:white;
}

To hide breadcrumb tag & Notes section - breadcrumb

.ms-socialNotif
{
display:none;
}

Change the font color of Browse and Page text in the menu
.ms-cui-tt-span
{
color:black;
background:white;
}


Change the background color of top bar (site actions, browse, page)

.ms-cui-topBar2
{
background:white;
}

Make all menu item color black

.s4-tn li.static > .menu-item
{
color:black;
border-color:black;
}

Menu item background color

.s4-tn li.static a.menu-item
{
background:white;
}

Global navigatioh selected item color red i.e. first tab

.s4-toplinks .s4-tn a.selected
{
color:red;
border-color:black;
}

Global navigation menu item hover - black

.s4-toplinks .s4-tn a.selected:hover
{
color:black;
}

Menu item hover

.s4-tn li.static > a:hover
{
background:white;
border-color:black;
border:thin;
color:red;
}

Change the Action Button background color -Logged on Username

.ms-SpLinkButtonActive a,.ms-SpLinkButtonActive a:hover{
color:red;
text-decoration:none;
background:FFDBAD;
}

Change the background color of the web part header where the Title is 'Working at ABC'

.ms-WPHeader TD[title^="Working at ABC"]
{
background:#FF9900;
}

Change the font color of logged on username

.ms-SPLink A:link,.ms-SPLink A:visited
{
color:gray;
text-decoration:none;
font-size:14px;
font-weight:bold;
text-decoration:underline;
}

SharePoint 2010 Developer Dashboard

How to Set On/Off Developer Dashboard in SharePoint 2010

Open "SharePoint 2010 Management Shell".

Go to Start > All Programs >> Microsoft SharePoint 2010 Products >> SharePoint 2010 Management Shell

Run As Administrator
Make sure you run "SharePoint 2010 Management Shell" as an Administrator. You wont be able to perform this operation otherwise. Right click on "SharePoint 2010 Management Shell" select "Run As Administrator"

Turn On Developer Dashboard
------------------------------------------------
Stsadm -o setproperty -pn developer-dashboard -pv on

Turn Off Developer Dashboard
------------------------------------------------
Stsadm -o setproperty -pn developer-dashboard -pv off


Enjoy :-)

Create Themes for SharePoint 2010 in PowerPoint

Create a Theme in MS Power Point for SharePoint 2010.


* Open MS PowerPoint


* Office Button --> New


* Under Templates tag select "Installed Themes". Select any theme then click Create button as shown:


* Select Design tab


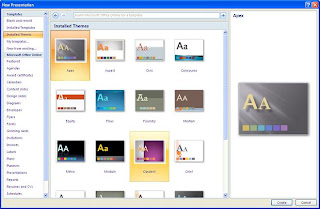
* Click on Colors dropdown on the right then 'Create New Theme Colors'


* Change the colors as you like then click on Save button.


* Now you have to save this file as a theme. Click on Office Button


then click on Save As


* Enter filename and select "thmx" as Type from drop down and click Save.


* Theme is saved by the name of Orange.


Add Theme to SharePoint


Now lets go to SharePoint site and then see how we can add our customized theme to the site.


* This is the SharePoint site:


* Go to Site Actions then Site Settings:


* On Site Settings page click on "Themes" under Galleries sections:


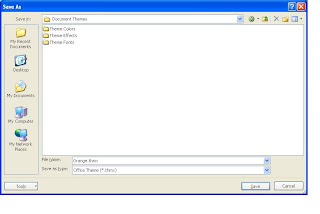
* Click on Upload Document as shown below:


* It will open a File Dialog box where you select the theme which was created in PowerPoint.


* You would see the uploaded theme "Orange" in the list.

* The Theme has been uploaded in the gallery. Now activate the theme to see how it looks.


* Go to Site Actions then Site Settings. Click on "Site Theme"


* Select the Orange theme from the list then click on Apply


* Site theme has been changed successfully.


Comments plz.


Thx